FINTRAC / AML
Effective October 11, 2024, all mortgage lending entities are required to adhere to updated Anti-Money Laundering (AML) and Anti-Terrorist Financing (ATF) regulations under the Proceeds of Crime (Money Laundering) and Terrorist Financing Act (PCMLTFA). Below outlines the tools available to you within Scarlett Origination to assist with your compliance process.
Related Training
FINTRAC Record Keeping
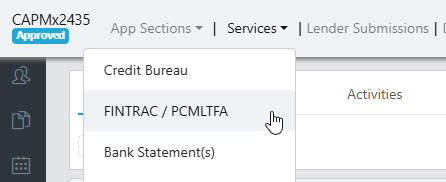
Built into every Scarlett Origination deal is a FINTRAC record keeping section. To access this section, Click "FINTRAC" from the Services drop-down menu.
Entering Information into the FINTRAC Record
Risk Level & FINTRAC Reporting status
The top section of the FINTRAC record shows the risk level associate to this file. By default, all deals will start with an "Incomplete" risk assessment.
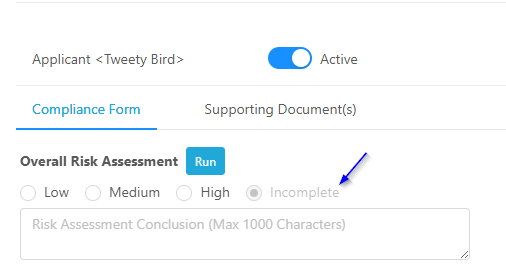
Once you have entered the information about the property and transaction details, you will click "Run" in order to apply the risk level to the file based on your FINTRAC Settings.
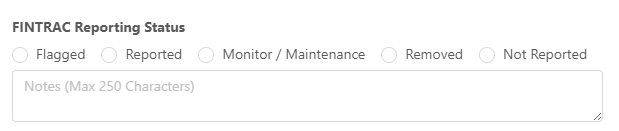
This is also where you, or your brokerage compliance admin, will select the FINTRAC Reporting Status, and enter any notes to explain the selection.
Property & Transaction Information
This section will have your subject property address as the header. This section of the record allows you to enter information about the transaction type and the neighbourhood.
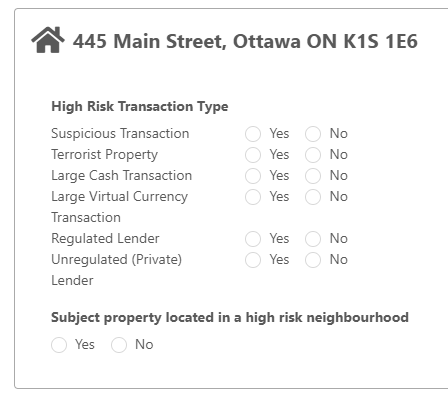
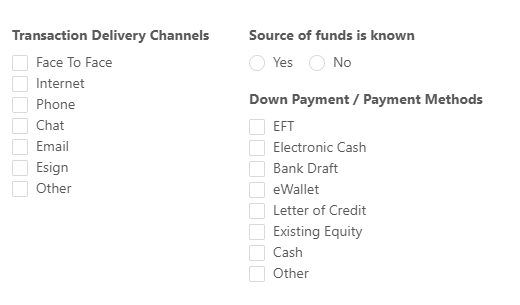
This is also where you enter information about how you conducted the transaction, where the source of funds for down payment came from, and how the down payment is transmitted to for closing.
Applicant Identity Verification
The next part of the record will populate a section for each applicant on the deal. This section allows you to complete identity verification and PEP, Sanctions List & Adverse Media screening.
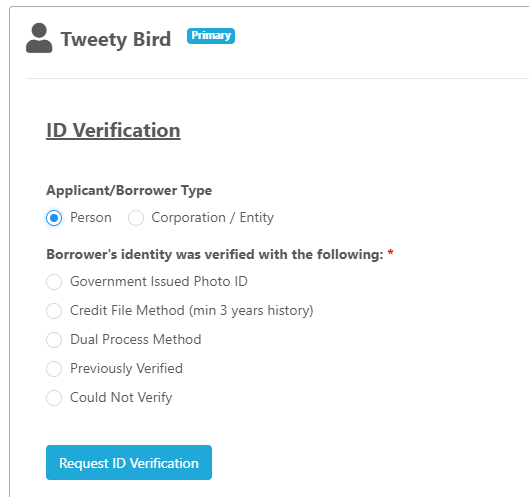
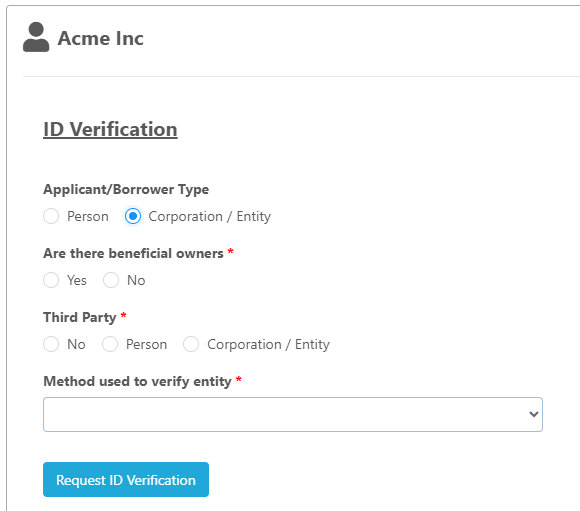
Indicating whether the applicant is a person or a corporation/entity will change the subsequent sections to be filled.
Example: Person
Example: Corporation/Entity
You can either enter the information about your manually completed identity verification, or you can use the "Request ID Verification" button to use the service from Equifax or Verifast.
To use one of the paid services, click on "Request ID Verification".
This will bring up a service option menu.
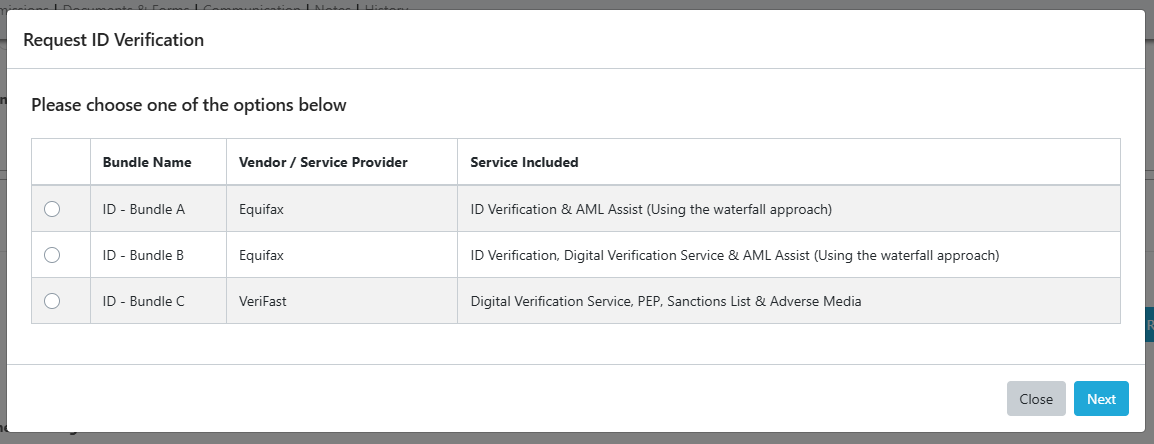
Select the service you wish to order and click "Next".
ID - Bundle A (Equifax) - ID Verification & AML Assist
When selected, the search will take a moment to get results. For this option, Equifax compares the information on your application to the credit profile they have to confirm an ID match.
The report will be complete even if Equifax was not able to confirm identification using this method. In this case the status will reflect as "Not Verified" or "Failed".


Further information regarding Not Verified & IDV failure can be found later in this article.
When successful, the status will update to indicate "Completed" and the PSA report will be available for download.

ID - Bundle B (Equifax) - ID Verification, Digital Verification Service & AML Assist
When selected, Equifax first tries to complete ID verification using the information on your application and the credit report (as in Bundle A), but should that option fail, they progress to contacting your client for Digital Verification Service via text message.
The status will reflect as "Pending" until your client has completed the steps on their end, at which time it will update to "Completed" or "Not Verified".
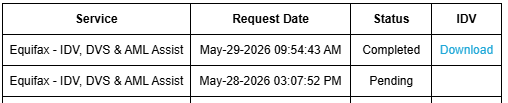
Your client must action the text message within 30 minutes, otherwise the service will not complete and you will need to re-order it.
ID - Bundle C (VeriFast) - DVS, AML, Sanctions List & Adverse Media
When the VeriFast option is selected, the system will pop-up a warning that this service charges credits. Click OK to proceed. Note that these credits are charged when the report is returned from Verifast, and not when the order is placed.
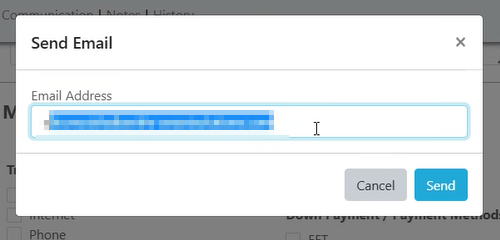
Next a pop-up will request the email address you wish the verification request to be sent to. This defaults to the email address associated with the client.
The order status will appear as "Pending"

Your client will receive an email directing them to the VeriFast service to complete the IDV.
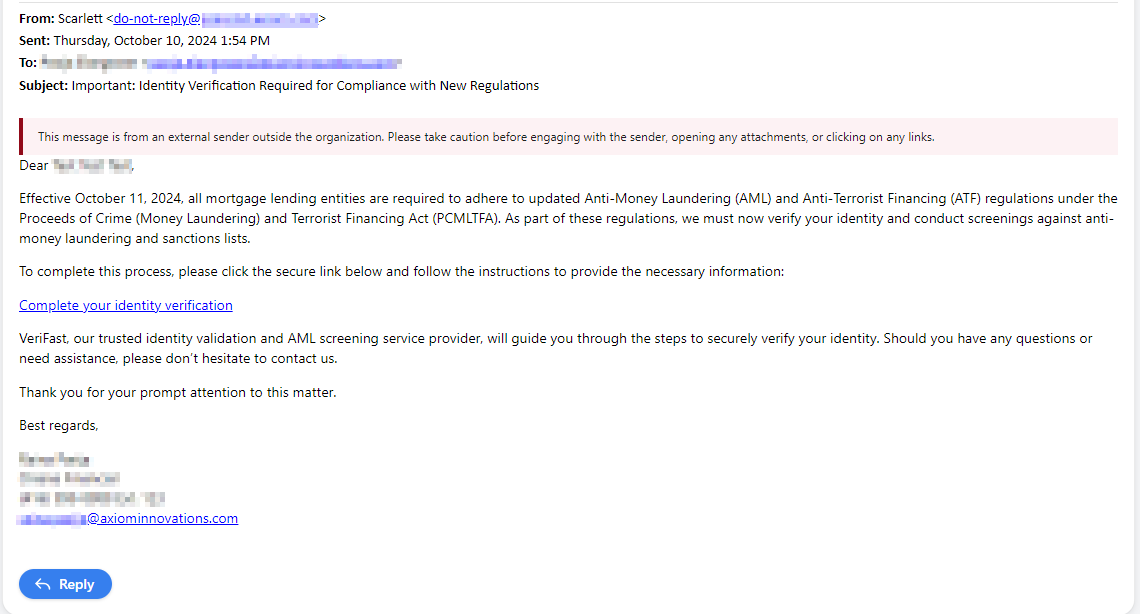
They must complete this email within 30 days in order for the report to appear within Scarlett.
Once complete, the status for your client will update and the PDF will be available for download. This PDF will also automatically be saved to your Documents & Forms within the deal.
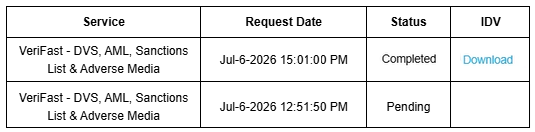
The report received from VeriFast will have their IDV pass/fail status, as well as information on Adverse Media, PEP lists, and Sanctions.
Applicant PSA Screening (PEP, Sanctions List & Adverse Media)
This section can be completed either manually, or using one of the services available through Scarlett (Equifax or Verifast).
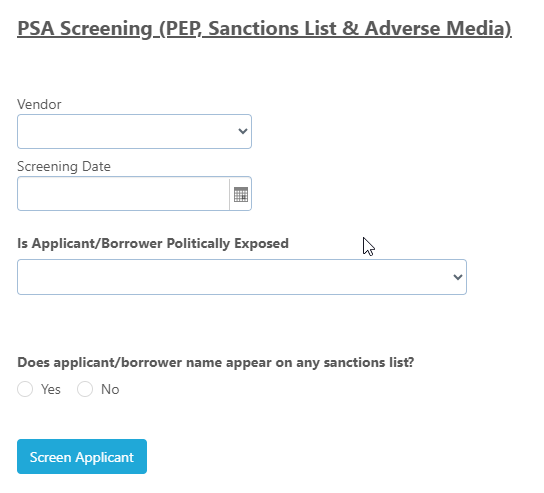
To screen an applicant using a service from Equifax or Verifast, click the "Screen Applicant" button.
PEP & Sanc - Bundle A (Equifax)
When selected, the search will take a moment to get results. You will see the screen update to indicate the status is "Completed" and the PSA report will be available for download.

PEP & Sanc - Bundle B (VeriFast)
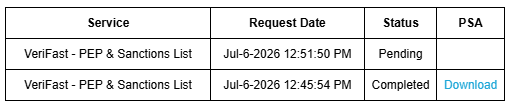
When selected, the service will initially show as "Pending". No email is sent to your client for this VeriFast option. The search will take a moment to get results and you may need to refresh your screen.
You will see the screen update to indicate the status is "Completed" and the PSA report will be available for download.
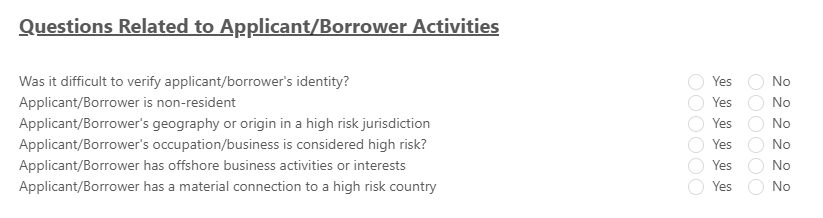
Questions Related to Applicant/Borrower Activities
This section has questions specific to the applicant.
Documenting the FINTRAC Record
Supporting Documentation
You can upload supporting documentation for your FINTRAC record using the "Upload Supporting Document(s)" button at the top of the FINTRAC record.
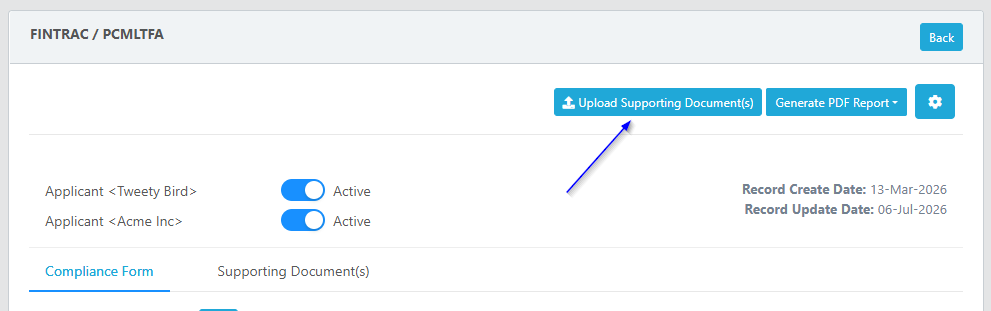
Uploaded supporting documents can be found in the "Supporting Document(s)" tab of the report.

You can view or remove supporting documents from this section.
Exporting the Record
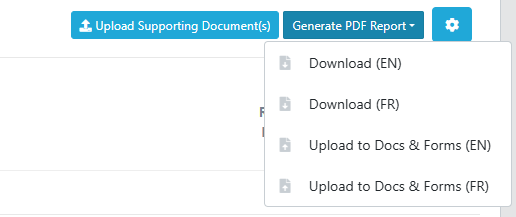
If you need to generate a summary of the FINTRAC record, click the "Generate PDF Report" button at the top of the FINTRAC record.

You have the option to download either a French or English PDF or upload it automatically to the Documents & Forms section.
Risk Settings
When you click "Run", a FINTRAC Risk Level is assigned to your file, based on criteria in your settings. This may be managed individually, or by the brokerage.
Access your settings by clicking on the gear icon at the top of the FINTRAC section of your deal.

Risk Criteria
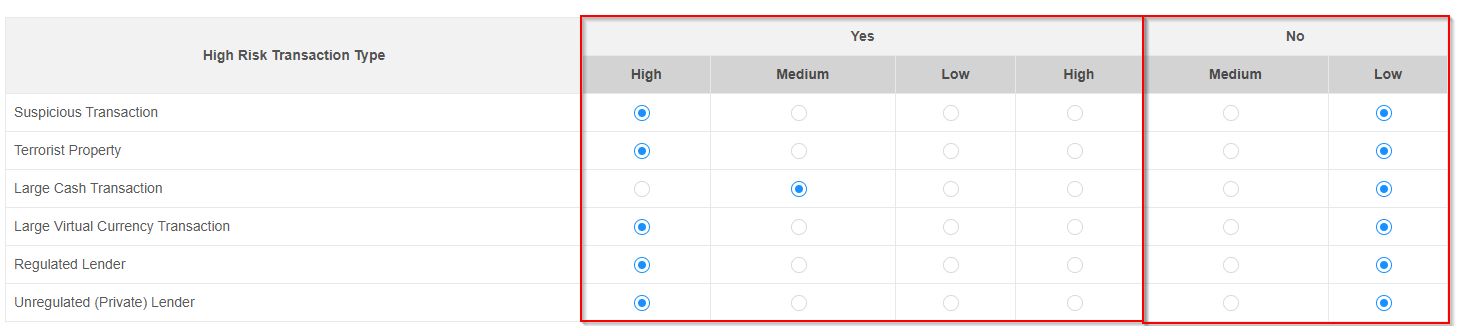
This will open the settings page where different criteria on the file can be set to High/Medium/Low depending on whether the answer to the line is Yes or No.
Recurrent Review Setup
This section allows you to set the frequency at which files should be reviewed.
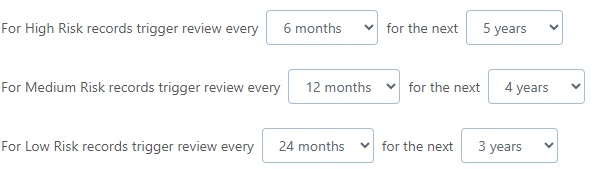
This will be used to populate the "Next Review Date" when the Run button is pressed.
Automatic Screening Preferences
This section allows you to select the IDV or PSA screening that should automatically run on the Next Review Date.
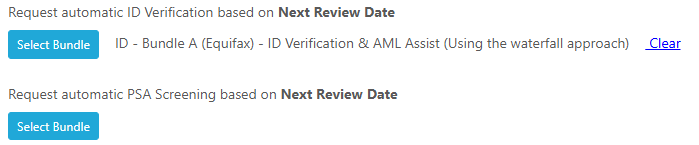
Click "Select Bundle" to choose from the available paid services.
Click "Clear" to remove a previously selected option.
Automatic Screening is an optional service in Scarlett.
FAQ
Why is my Equifax IDV showing as "Failed"?
If the status of your Equifax order is showing as "Failed", download the report from the IDV column to see details.

There are two pages to the report. Scroll to the second page. On this page it will show the message Scarlett received back from Equifax about the failure.
Most commonly received is "Invalid Member Number and/or Security Code".
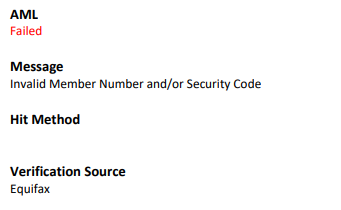
If you receive this message, it means one of three things:
Your Equifax Member ID was not configured to have the KYC Connect feature. Contact your Equifax rep to have this feature enabled on your Member ID.
Your Equifax Member ID has KYC Connect, but has not been authorized for use over Scarlett.
Your Equifax bill is currently overdue and services have been suspended.
Why is my Equifax IDV showing as "Not Verified"?
If the status of your Equifax order is showing as "Not Verified", download the report from the IDV column to see details.

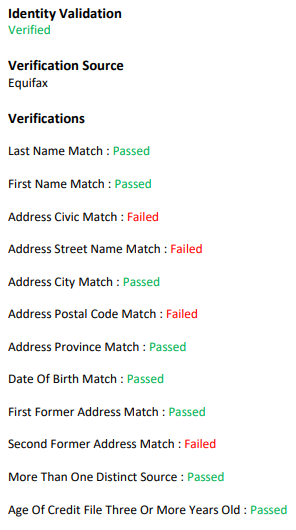
There are two pages to the report.
The first page shows information about the Identity Validation. This is the result of Equifax comparing your application information to the credit bureau record they have for this same applicant.
The second page contains information on the AML Assist. This is where Equifax looks to see whether two tradelines from two distinct sources have applicant information that is consistent with your application.
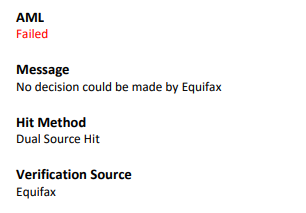
In some cases Equifax will not be able to match the applicant information to 2+ tradelines, and this section will be indicated as failed. Common reasons for failure are:
The applicant has tradelines from only one source reported to credit
Only 1 source matches the name or address you have on the application exactly (recent move or name change could affect this)
I clicked "Run" but the Next Review Date did not populate.
Not to worry, it will populate. The system checks for these dates every 20 minutes.